
Courtesy of Groovy Post

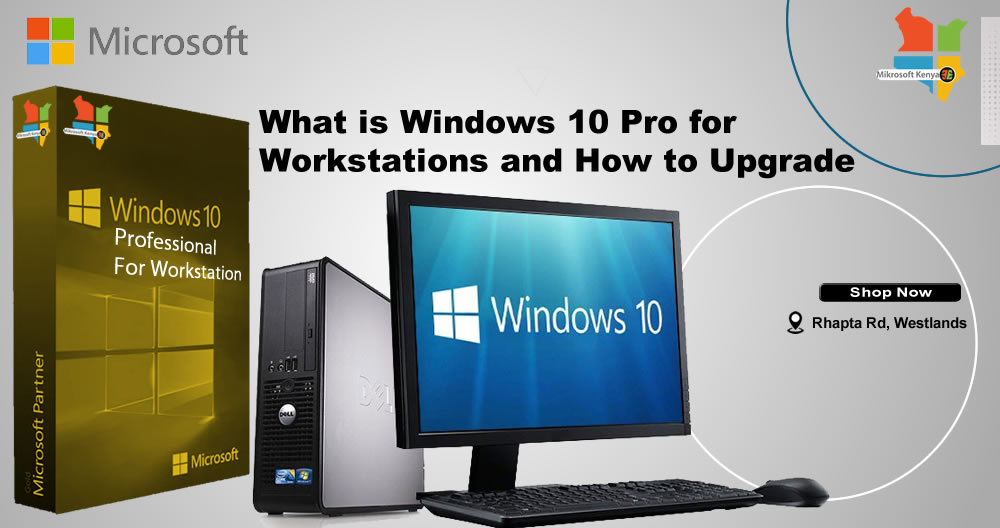
The latest edition of Windows 10 from Microsoft targets workstation hardware. Find out what’s in it, how it compares with other editions and how to upgrade.
There is a new member of the Windows 10 family called Windows 10 Pro for Workstations. The latest edition inherits features previously found in the standard Windows 10 Pro, such as the Resilient File System. Microsoft targets this edition at its customers with the most demanding requirements, such as those working in science and engineering. For example, one of the high-end capabilities found in Windows 10 Pro for Workstations addresses up to 6 TBs of RAM. Meanwhile, Windows 10 Pro 64 bit tops out at 2 TBs. In this article, we’ll look at what’s in it and determine if it is right for you and how you can get it.
What’s included in Windows 10 Pro for Workstations?
Features exclusive to Windows 10 Pro for Workstations include the Resilient File System (first introduced in Windows 8); persistent memory; faster file sharing through SMB Direct; and support for the latest high-end workstation processors from Intel and AMD. Here’s a summary from the Windows Blog:
- ReFS (Resilient file system): ReFS provides cloud-grade resiliency for data on fault-tolerant storage spaces and easily manages very large volumes. ReFS is designed to be resilient to data corruption, optimized for handling large data volumes, auto-correcting, and more. It protects your data with integrity streams on your mirrored storage spaces. Using its integrity streams, ReFS detects when data becomes corrupt on one of the mirrored drives and uses a healthy copy of your data on the other drive to correct and protect your precious data.
- Persistent memory: Windows 10 Pro for Workstations provides the most demanding apps and data with the performance they require with non-volatile memory modules (NVDIMM-N) hardware. NVDIMM-N enables you to read and write your files with the fastest speed possible, the computer’s main memory speed. Because NVDIMM-N is non-volatile memory, your files will still be there, even when you switch your workstation off.
More Features
- Faster file sharing: Windows 10 Pro for Workstations includes a feature called SMB Direct, which supports the use of network adapters that have Remote Direct Memory Access (RDMA) capability. Network adapters with RDMA can function at full speed with very low latency while using minimal CPU. For applications that access large datasets on remote SMB file shares, this feature enables:
- Increased throughput: Leverages the full throughput of high-speed networks where the network adapters coordinate the transfer of large amounts of data at line speed.
- Low latency: Provides speedy responses to network requests and, as a result, makes remote file storage feel as if it is directly attached storage.
- Low CPU utilization: Uses fewer CPU cycles when transferring data over the network, which leaves more power available to other applications running on the system.
- Expanded hardware support: One of the top pain points expressed by our Windows Insiders was the limits on taking advantage of the raw power of their machine. Hence, we are expanding hardware support in Windows 10 Pro for Workstations. Users will now run Windows 10 Pro for Workstations on devices with high-performance configurations, including server-grade Intel Xeon or AMD Opteron processors, with up to 4 CPUs (today limited to 2 CPUs) and add massive memory up to 6TB (today limited to 2TB). Source
How do you upgrade to Windows 10 Pro for Workstations?
The sound of Windows 10 Pro for Workstation features might make you think it’s out of reach for mere mortals, but it’s actually quite accessible. Users needing its unique features will be able to acquire it multiple ways. Of course, the easiest option is through one of Microsoft’s hardware partners, such as Dell, HP, or Lenovo. But for users who might have an existing system, you can get it through a couple of other channels.
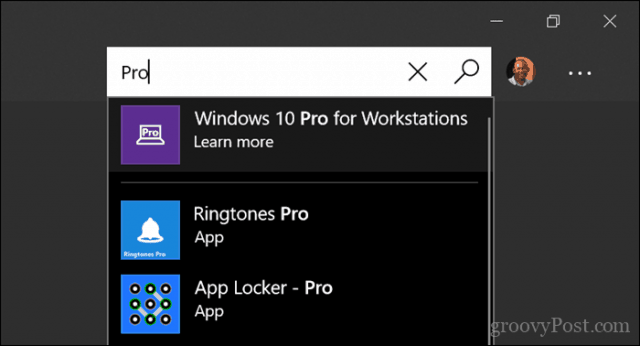
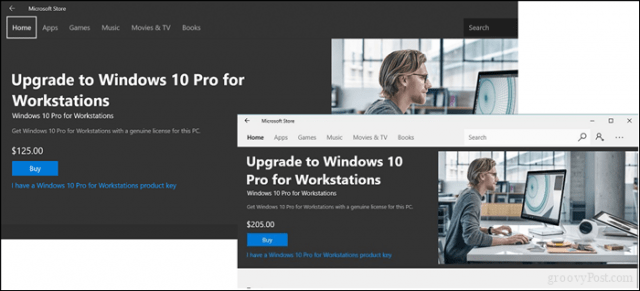
Users can upgrade to Windows 10 Pro for Workstations from the new Microsoft Store app. Open the Store, search for Pro, then click the result Windows 10 Pro for Workstations.
The cost to upgrade will vary. A full license will cost about $205, while an upgrade from Home or Pro will cost about $125.
The ISO Method
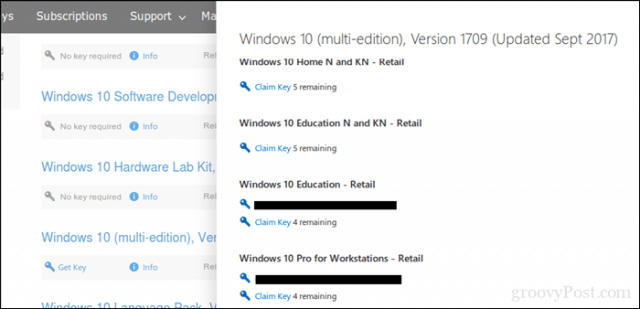
If you are subscribed to Microsoft’s Visual Studio Subscriptions, you can download an ISO image containing the install files for Windows 10 Pro for Workstation. I did this, but I soon discovered no specific option to choose Windows 10 Pro for Workstations during setup. The features are actually enabled as an add-on using the standard Windows 10 1709 image.
So, the first thing you will need to do is install Windows 10 Home or Pro Fall Creators Update version 1709. Next, grab a key from your MSDN subscription for Windows 10 Pro for Workstations.
Microsoft also notes on its software download page that you will need to reinstall Windows 10 Pro if you plan on reinstalling Windows 10 Pro for Workstations. You will then be able to upgrade again through the new Microsoft Store app.

In Windows 10 Pro, open Start > Settings > Update & security > Activation.
Click the link to change the product key, enter the product key, then click Next.
Voila! Your installation is automatically transformed into Windows 10 Pro for Workstations. I didn’t even need to reboot. It turns out this edition is about enabling features, not fundamental changes to the operating system itself.

For users just curious to see what’s different in this edition and how it performs, you can try it out in an unactivated state. Microsoft documentation provides diagnostic keys for Windows 10 Pro for Workstation to upgrade an existing installation.

How Does it Compare to Windows 10 Enterprise?
Windows 10 Pro for Workstations is not a superset of Enterprise—they are on par with each other, and Microsoft plans to provide the same features to customers running that edition. Windows 10 Enterprise is a volume license client available to organizations that deploy Windows 10 to hundreds or thousands of devices for those who don’t know.
So, that’s how you can get Microsoft’s latest edition on your device. You won’t see any striking benefits on average machines. This is really for a specialized market where the hardware takes precedence. Everyday users and enthusiasts are best served by existing editions such as Home and Pro. Windows 10 Pro, in particular, is advantageous because of its numerous built-in controls, especially for services like Windows Update.
There you have it, Microsoft’s new powerful edition of Windows 10 for systems that need it. Let us know in the comments if you need such an edition.
How to Enable Two Factor Authentication for your Zapier Account

Zapier now allows you to enable Two Factor Authentication to secure your account login. Here’s how to enable it.
Zapier is one of my favorite online services. It allows me to set up simple automation tasks between various cloud services like Gmail, Dropbox, and OneDrive. Today, Zapier sent me an email asking if I was trying to reset my password. Not good. Looks like someone is trying to hack my account.
While I was resetting my password (just in case…), I noticed Zapier now supports Two Factor Authentication (2FA). As you know, we’re always talking about how important it is to enable Two Factor auth. online. So, with this in mind, follow along as I enable it to my Zapier account
Quick Steps
- Login to Zapier > Click Down Arrow next to Profile Box
- Click Settings
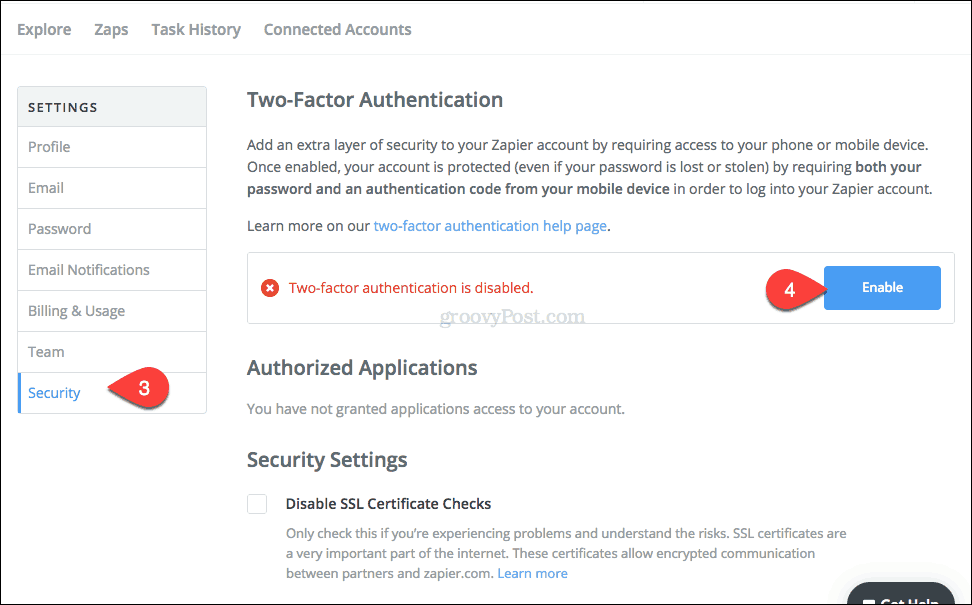
- Click the Security Tab
- Click Enable Two Factor Authentication
How to Enable Two Factor Authentication for your Zapier Account
Step 1: Login to Zapier, Click Down Arrow next to Profile Box and Click Settings.

Step 2: Click Security Tab, Click Enable Two Factor Authentication.
Step 3: Zapier will now walk you through the registration process. We recommend using Authy, Google Authenticator, or Microsoft’s Authenticator app to manage all your 2FA logins.
That’s how to lock down your Zappier account, but please don’t stop there. Check out our Two Factor Authentication guide for the steps for locking down all your other online accounts.

Apps on your Fire tablet will pop up notifications, but some apps overdo it and you might not need them. Here is how to manage app notifications on your Fire.
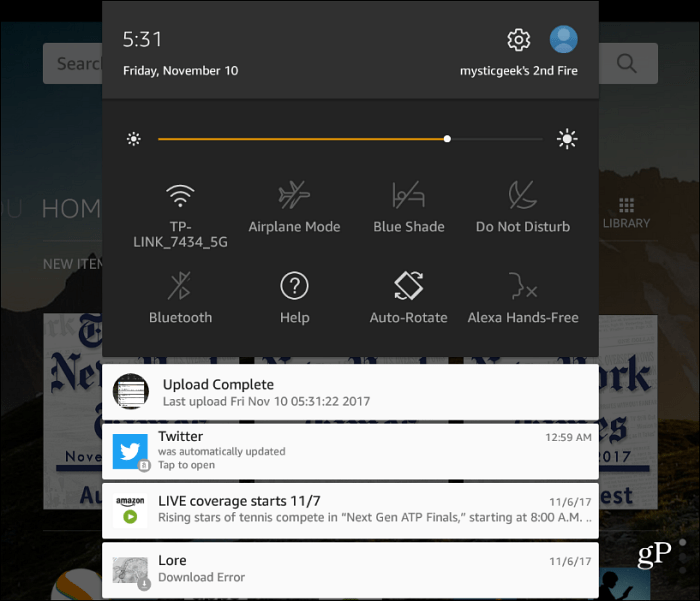
Apps on your Fire tablet will send you notifications that pop up in the notification shade which can be helpful if you get a news update or message to respond to. Amazon’s Fire tablets run a customized version of Android called Fire OS. And, unlike apps on iOS, it doesn’t give you the option to turn down push notifications. Here is a look at how you can turn app notifications on or off.
Manage App Notifications on Amazon Fire Tablet
Like other recent versions of Android, you can see your notifications by swiping from the top of the screen down to display the notification shade.
To manage notifications, head to Settings > Sound & Notification > App Notifications. Note that all apps will be installed with the default to display notifications.
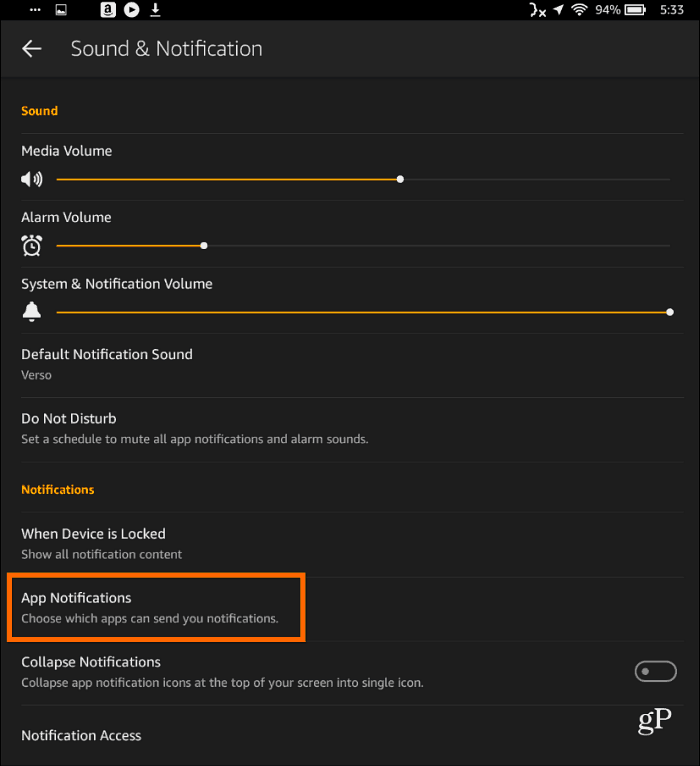
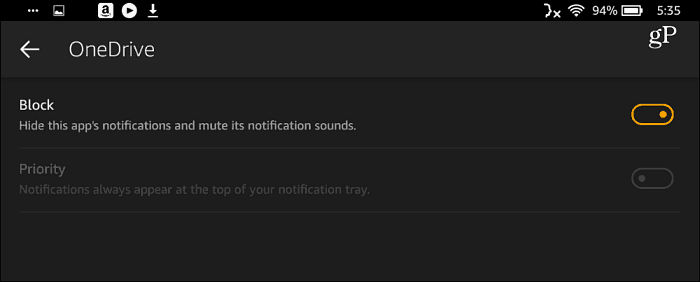
Next, scroll through the list of apps and tap the one you no longer want to see or hear notifications for. On the next screen, you can block the app’s notifications completely. Or, set it as a priority so it always appears at the top of your notification list.
The Amazon Fire tablet is meant to be an entertainment device. Still, you can get some productive things done but probably don’t want to be constantly reminded of emails or other work items. It’s also just plain annoying having a noisy device alerting you about every little thing.
There are other advantages of disabling app notifications, too. It will reduce the amount of bandwidth being used on your network, which is helpful in a busy household. And it can help improve the battery life of the tablet.
How do you manage app notifications on your Fire tablet or any other mobile device? Let us know your thoughts in the comment section below.
Courtesy of Groovy Post