Looking to fix and resolve Windows Server 2019 activation errors? In this article, we will help to resolve it.
Windows Server 2019 is here as of now, and you are excited to see how it has taken shape. However, what if you are coming up with the activation errors? There can be several activation errors you would be facing, and getting through them should not be difficult as such. Let us check out how you can get through the Windows Server 2019 activation errors.
How to fix and resolve Windows Server 2019 Activation Errors?
The most common error you would come across when using Windows Server and activating it would be ERROR 0X80070490. There may be a few other error types as well. We will check out how would you be able to resolve the issues to activate your Windows Server 2019.
How to resolve Windows Server 2019 error 0X80070490?
This is one of the common errors you would find while attempting to activate your Windows Server 2019. The error has something to do with the server failing to detect your product key in some way.
The exact text you get while attempting to activate Windows Server 2019 reads as follows –
The product key you entered didn’t work. Check the product key and try again or enter a different one. (0x80070490)
The error description may be slightly confusing and misleading. Do note that it has nothing to do with the licensing of your application. Studies have indicated that the error has a reference to the Windows Store or Windows errors.
The fix should be quite simple enough. Attempt activating your Windows Server using the following command line-
slmgr.vbs -ipk XXXXX-XXXXX-XXXXX-XXXXX-XXXXX
slmgr.vbs -ato
The activation should even be done with the first line alone. If it does not work for you, you may need to go with the second line. It may also be a good idea to go with both the lines to ensure you will be able to activate your Windows Server 2019 right away.
Another option can be to use the following command line –
cscript c:windowssystem32slmgr.vbs /ipk <product-key>
Ensure that you have access to the right updates on your Windows Server 2019
Make sure you have the right access to the KMS or Key Management Services to ensure that your Windows Server 2019 is activated successfully.
KMS makes use of a client-server route to activate the users. The KMS clients will connect with the KMS server (also called KMS Host) for processing activation of your Windows Server installation. Make sure that the KMS Host resides in your local network.
If you are looking to activate Windows Server 2019, you will need to take note of the KMS and which operating system is it hosted on. For activating Windows Server 2019, your KMS should be hosted on Windows Server 2012 R2, Windows Server 2016, and Windows Server 2019.
Use Command prompt for activating your Windows Server 2019
Most of the users have claimed that trying to activate your Windows Server 2019 through the GUI from within Windows Server 2019 throws errors. No matter how perfect your setup and configuration be, you tend to get errors quite frequently.

The right way would be to Command line to assure that you do not run into any activation errors. Here are the steps that should be helpful enough.
- Log in to your Windows Server 2019
- Head over to Settings and then to
- Go to About section and confirm the edition of your Windows Server 2019.
- If the edition is standard or belongs to any of the non-evaluation editions, you should be able to activate the version without the need for a reboot
At this stage, you may be prompted to activate using the GUI, but never do it as you will face activation errors ideally in most conditions even when your connection is stable. We will be using Command Prompt and PowerShell for activation.
- Launch PowerShell or Command Prompt as an administrator.
- Type in the following command and press ENTER
slmgr /ipk your_product_key</li>
- This should launch a Windows Script Host option, and it will show install product key xxxxx-xxxxx-xxxxxx-xxxxx
- Close the host window by clicking on OK
- Enter the following command and press ENTER
slmgr /ato</li>
- Once again a Windows Script Host window should pop up indicating that the Windows Server 2019 is activated successfully.
- Click OK t close this window.
That does it. You have successfully activated your Windows Server 2019.
However, when you check the Server edition through the About screen, you may again find it showing up your edition as Evaluation copy. If this happens with you, follow the steps here below.
Launch the following command on PowerShell or Command Prompt –
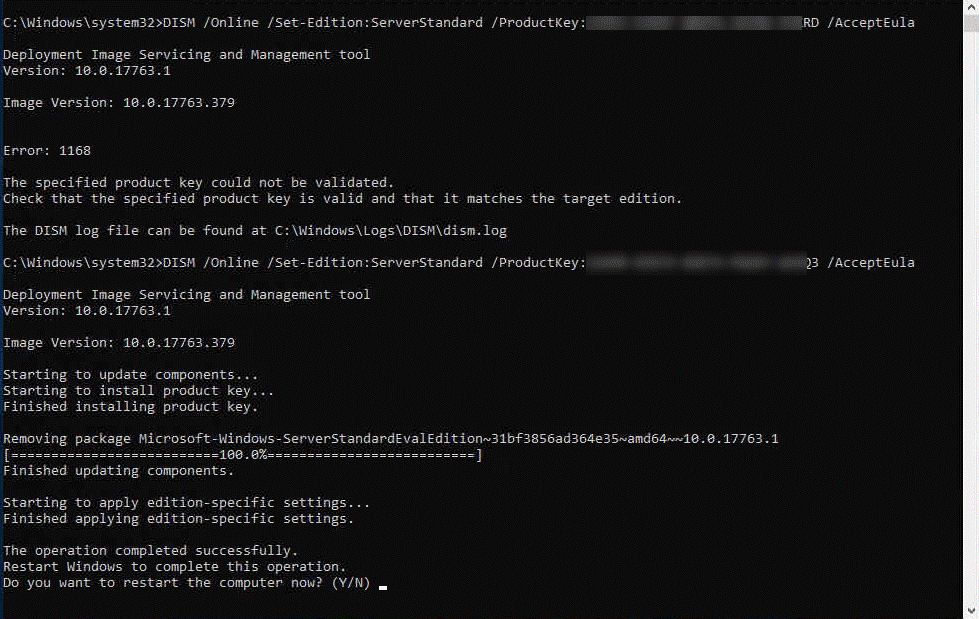
DISM /Online /Set-Edition:ServerStandard /ProductKey:xxxxx-xxxxx-xxxxx-xxxxx-xxxxx /AcceptEula
If you are running Windows Server 2019 Datacentre edition, you will need to enter the following command
DISM /Online /Set-Edition:ServerDatacenter /ProductKey:xxxxx-xxxxx-xxxxx-xxxxx-xxxxx /AcceptEula
When you are prompted to reboot your device, accept it by typing Y, and your activation should be done.
Please note that you should be able to ensure that you are using the right keys to activate the right kind of Windows Server 2019. You can run into specific activation errors if you fail to pay attention to these pointers.
You will not be able to use your retail or VLSC MAK key to activate an evaluation edition of Windows Server. Doing so will throw the error 0xC004F069.
Using VLSC MAK key can result in the activation error Error 1168 the specified product key could not be validated
Automate Windows Server activation on Virtual Machines
It may be a good idea to activate Windows Server 2019 on virtual machines is to automate the functionality. This was a feature introduced with the Windows Server 2012 R2.
The technique can work in an efficient manner that can activate the virtual machines when it starts up. This will do away the need for entering the licensing details for each of the virtual machines you may have.
You can do it manually or opt for going with the PowerShell method to automate the activation of your Windows Server 2019 virtual machines. It will involve running a script from within your PowerShell. You can get the script from your network administrator, or if you are proficient enough, you can create one easily.
The Parting Thoughts
Those were the steps that should address most of your concerns concerning the activation of your Windows Server 2019 edition. We have attempted to solve most of the problems you may come across while activating Windows Server 2019 in this tutorial.
If there are any other errors you may have found affecting or restricting your activation, do share them here. We will guide you to the right kind of fixes.
Disclaimer: The Questions and Answers provided on https://www.gigxp.com are for general information purposes only. We make no representations or warranties of any kind, express or implied, about the completeness, accuracy, reliability, suitability or availability with respect to the website or the information, products, services, or related graphics contained on the website for any purpose.


